Valentine’s Day Date Night Outfits

It’s almost Valentine’s day!!  I love this holiday.  I mean let’s be real, who doesn’t love getting boxes of chocolate and biting in to every single piece to find your favorite!  Come on, you can’t tell me I’m the only one who does that? 🙂

Valentine’s day is always a super cold day in Michigan but I still like to take the night to go out to dinner with my hubby.  That said, I like to keep it easy yet trendy since the walk from outside to inside is pretty brutal this time of year.  Below are a few of my favs!


We have a new line of fun legging, boyfriend flying monkey jeans and printed pants along with flattering tunics and chiffon tops.  Check out poshnovi.com to grab your date night outfits!

XOXO,

Mel ❤

Pure Michigan

Hello Posh Dolls! Today I am so excited to share with you the fun that my family had eating, shopping, and exploring Mackinac Island, St. Ignace, and Tahquamenon Falls. I am so excited that I got the opportunity to blog this as a posh doll and tell you about the experience my family and friends had. I hope that some day soon you can experience them as well. If you are from out of state and need a reason to visit Michigan these are surely reasons to come. (Most of my outfits you can get from posh.

My name is Darby, I am 19 years old, and I am an employee/model for Posh boutique. I share a love of fashion and taking photos, along with the owner Melissa, and we thought this would be a perfect opportunity to share with our Posh Dolls the perfect vacation in Michigan.

My family is from Michigan, but this was special occasion for us because a week previous my sister turned 21. We decided to take this trip to help her celebrate. There were many places to go and we tried to hit every one of them. Mackinac Island is not only known for their amazing fudge, but also for the Michigan history it holds.

IMG_0008 IMG_0010IMG_2026

IMG_2055

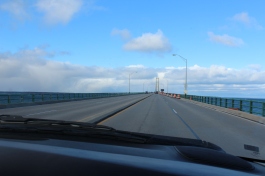
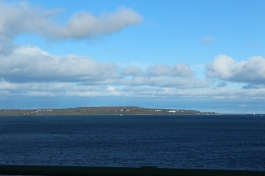
The Mackinac Bridge – In order to get to the ferry or the plane that takes you to the island you have to cross the iconic Mackinac Bridge. From the bridge you can see the island and the beautiful Lake Michigan and Lake Huron. As you continue to cross the bridge you can choose to go to St. Ignace or keep going North. We stayed at a house in St. Ignace, so we had to take the route to St. Ignace.

IMG_0041 IMG_0058

IMG_0029

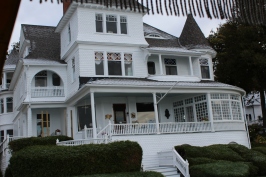
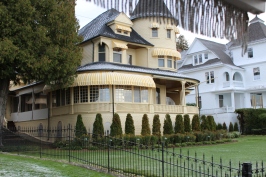
The Love Shack – My mom is always the one who finds the places that we stay. She picked the house that could sleep the most because my family is big. In the photo above we are missing my mom, me, and three more close family friends who were joining us on the trip as well. The house that my mom booked was called The Love Shack. It ran around $100 a night not including the fee per dog. We only brought our little pup Niki to keep my grandma company when we went to the Island. The Love Shack had a total of five bedrooms, but slept six. It was right by the water in the town of St. Ignace. We got to the house that evening so we decided to go for dinner then watch the hockey game.

MACKINAC ISLAND

IMG_0105 IMG_0098

IMG_0102 IMG_0096

IMG_0086

The Flight to the island – My family, being the adventurers we are, took the small five passenger planes over to the island. They fly you by the bridge and to the island. The view with all the fall colors and the calmness of the water on that day was breathe taking. We picked the weekend of peak coloring for that reason, even though the weather was a little bit chilly. When you first see the plane you immediately think of the planes you see on movies and it doesn’t usually end well, but when it gets going it is not even close to that. The view is breath taking and you could not experience that any other way. This certainly is a must the next time you venture to Mackinac Island. You do have to make a reservation for the time that you fly. It costs $50 for an adult ticket and $35 for children. We traveled in two planes since we had 10 people going to Mackinac Island and when they came we called the taxi.

IMG_0106 IMG_0107

The Mackinac Island Taxi – When you think of a taxi you think of the yellow taxis in New York right? On Mackinac there are no such thing. Since car and motor vehicles are not allowed on the island the only mode of transportation is by a horse, walking, or a bike. We went the walking and the horse route. Our taxi driver was born and raised on the island, but no longer stays there for the winters. While riding in our taxi we got to see some amazing houses owned by the islanders.

IMG_0110 IMG_0108

As we just passed these we came to the grand hotel. You can see the Grand Hotel from the bridge and the plane as this big white building.

IMG_0112 IMG_0115

IMG_0118 IMG_0122

The Grand Hotel – The Grand Hotel is one of the oldest kept traditions, next to the no vehicles, on the island. They have a strict dress code for men and women staying in the hotel. Ladies have to dress in a dress or a skirt, no slacks. Men have to wear a coat and tie  at all hours after 6:00pm. If you want to get the full experience of Mackinac Island then staying in the Grand Hotel is the way to go. For a category 3 room during the weekend for a double it is $451.00 per person, per night, for a single it is $827.00 per night. Depending on the time of year will depend on the availability of the rooms as well. Seeing as we went to the Island in the morning when we got there we were all hungry and wanted some coffee to warm up.

IMG_0136 IMG_0132IMG_0139 IMG_0145IMG_0130

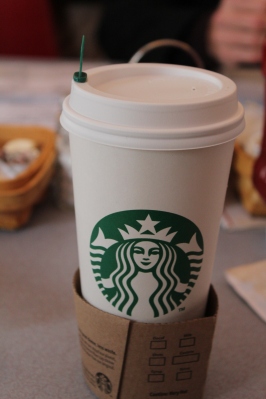
For coffee we stopped at Starbucks, of course. When we got our coffee we decided to go to the pancake house for some breakfast. The Pancake House only serves breakfast and is only open in the morning. After we had our coffee we decided to do some shopping before going horse back riding.

IMG_2195 IMG_2190IMG_2169

The Shopping – If there was one thing that they had it was shops. Shops that had so many things. They had t-shirts, homemade gifts, candles, eagle wine bottle holders, and a lot more. A lot of the shops have the same things in them when it comes to clothing but when it comes to the little keepsakes you can find different things in every store. When we were done shopping it was time to go horse back riding.

IMG_2244 IMG_2243IMG_2238 IMG_2237IMG_2223 IMG_2233IMG_2224 IMG_2222IMG_2225 IMG_0203IMG_0199 IMG_0209IMG_0198 IMG_0200IMG_0265

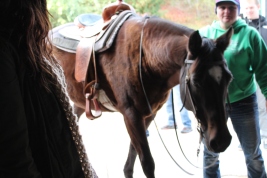
Horse Back Riding – For the horse back riding you have to be 10 years or older. Because my little sister was not old enough my parents rented a carriage for her, my dad, and my mom. My sister Jenna, her boyfriend Shawn, our family friend Coral, her boyfriend Alex, my younger brother Joseph, my best friend Lidya, and I went on our own horses. To rent a horse it is $45. You do not have to be an experienced horse back rider to ride the horses. They all have a great temper and are very easy to control. We also had a guide with us and if the horses acted up he was there to help. I would put this on the must list when coming to Mackinac Island as well because they take you on the horses where, as a tourist, you wouldn’t normally go. After that it was time for dinner. We ended up eating at the Mission Point Resort.

IMG_8703 IMG_0347IMG_0359 IMG_2276IMG_2275

Mission Point Resort -At Mission Point you can eat there, stay there, or do both. They host weddings and events, but in our case we were just there to eat and warm up. It was also a great place to sit and relax while we watched the Michigan, Michigan State game. While we were there it starting snowing as the sun was out. It was beautiful to see inside by a warm fire with my hot chocolate. When ordering the food we expected small, semi-normal portions, but to our surprise they were really big portions. So if you are looking for a good meal with a bang for your buck this is the place to go. Make sure you make a reservation depending on the time you go because it can get pretty busy. After we got done with dinner we took the fairy back to St. Ignace.

IMG_2182 IMG_0441IMG_2300

When we got back we were so tired we watched a movie, played some board games, and went to bed. The next day we visited Tahquamenon Falls and the Ship Wreck Museum. This was not in our original travel itinerary, but we thought it would be a great stop in the fall, which it was.

TAHQUAMENON FALLS AND SHIPWRECK MUSEUM

IMG_2364 IMG_2397IMG_2373 IMG_2337IMG_2389 FullSizeRender2IMG_8705
The Lower Falls – There are two falls, the lower falls and the upper falls. First you will come to the lower falls. The most amazing part of these is where they are located, the coloring during this time was amazing and adding the sound and site it is a must when you are traveling up that way. Even if you did not originally plan on going you should include in the trip. If you drive five minutes up the road you will arrive at the upper falls.

IMG_2416 IMG_2357IMG_2408 IMG_2352IMG_2434 IMG_2446IMG_2409 IMG_2423IMG_2439 IMG_8712IMG_8719 IMG_8732

The Upper Falls – The upper falls just proved how amazing mother nature can truly be. You do have to climb stairs that can be wet, so in my grandmas case, and some others, staying at the benches at the top and just seeing pictures is a safer way to go. If you can see it I highly recommend it. The pictures just can’t do it justice. After we saw the falls we headed up the road about 15 minutes to Shipwreck Museum. This is wear the Edmund Fitzgerald ships original bell is located at. It was a good place to go to get a history lesson and see some more history of Michigan.


Overall this was a great trip and if you ever get the chance to go you will not regret it. Taking a big group was definitely a lot of fun, but it would be just as fun with a smaller group of people. Getting to spend time with family and friends and learn so much about the beauty in Michigan is worth your while.

IMG_2457 IMG_2463IMG_2174 IMG_2186IMG_0149

Thank you for letting me share this trip with you, I hope you enjoyed reading about it. If you like any of the articles of clothing I was wearing visit poshnovi.com or come see we are located at 14 mile and Novi road. We would love to see you come in. Some of the items that were pictured we still have, others we do not, but we carry the similar styles.

Blessings.

XOXO

Darby


A Daddy keepsake project

Tis the season for homemade gifts from the kids. This is a craft that my kids and I did for my husband’s birthday.  The reason is because my husband likes to just pick out his own gifts but he loves to get homemade “cool” gifts from our kids.  This means, mommy (me) has to come up with this super cool idea, grab all the materials and sit down to make them with our kids.  This is a lot of pressure haha.  I love doing projects with our kids but coming up with cute ideas that are realistic can be a challenge.  My son’s idea was, “mom lets buy daddy a bulldog because Bulldogs are his favorite.”  We have two cats already so that is not happening.  Surfing for ideas I decided on a salt dough project.

This is a really cute keepsake and is also really fun for my toddler and kindergartener to do together. This is a great gift for any time because it is easy and thoughtful.

What you need:

1 cup flour (I added more as I mixed it up)

1 cup salt

1/2 cup of water

Paint

Toothpicks

Wax paper

Baking sheet

Place the water, salt and flour together in a bowl and mix up with fork. I had my 2-year old daughter help me with this part, well until she started trying to eat it. Lol. If it’s sticky start to add a little more flour until you can roll it into a ball and it’s the consistency of plays-doh. 


  After I rolled it out onto a piece of wax paper that I placed on a baking sheet and did my best to form it into a heart.  I placed each child’s foot into the mold to create their foot prints.  Then with the tooth pick I carved out each of their names and added the year.    

 I baked it at 200 degrees for 3 hours.  After I let it cool for a couple of hours.  After it fully cooled,I let the kids go to town decorating and painting it.  They each put their own personal touch on the gift.
Voila!  A creative and homemade keepsake my hubby can enjoy! I was able to spend a little time with the kids making it and they had a blast putting their own creativity into their project.  Yes, they did do quite a bit of fighting through the painting process but that’s what creates the memories, right?

XOXO,

Mel💕

Muffins and Pancake Muffins

Melissa and I are both obsessed with pumpkin for the Holidays (Halloween, Thanksgiving, and Christmas). We did not have much time to bake so we unfortunately could not make my favorite, pumpkin pie, but what we did make came close second. We made pumpkin muffins and pumpkin pancake muffins. I went to Kroger and bought a box of bread mix, a can of pumpkin puree, cupcake paper, and flour and it cost me $5. So if you are looking for something easy, cheap, and tasty this is the way to go.

*Don’t forget to preheat your oven to the temperature it calls for on the box.

We first started with the easy recipe, the muffins. The box I got was for bread, but there was a recipe right below for muffins so we followed the directions on the box.

IMG_9034

IMG_9033

After they were done baking we wanted to add a tasty frosting to give them something extra. We googled a simple recipe to make the frosting. I seem to find that homemade frosting doesn’t taste good, but this was surprisingly good and it wasn’t runny which I find to be a problem with some other recipes.

Homemade Frosting:

  • 2 cups of powdered sugar
  • 2 tablespoons of butter or margarine softened
  • 2 tablespoons of milk
  • 1/2 teaspoon of vanilla

Combine all ingredients in a bowl but do not over whisk. Just until all the ingredients are smoothly combined.

IMG_9035

After the muffins cooled we frosted them. We added some food coloring to make the frosting orange for Halloween.

IMG_9038

We wanted to make pumpkin pancakes but without the mess. Melissa says she usually makes pancake muffins. We looked up a pumpkin pancake recipe and then to find out for how long we bake them we looked up a recipe for pancake muffins.

*Preheat oven to 350 degrees.

IMG_9036

Homemade Pumpkin Pancake Muffins:

  • 1 1/4 cups of all purpose flower
  • 1/4 cup of white sugar
  • 2 teaspoons of baking powder
  • 1/2 teaspoon of ground cinnamon
  • 1/4 teaspoon of ground nutmeg (I accidently added a lot of nutmeg and they tasted very good. You can add it to your taste and liking.)
  • 1 cup of milk
  • 1/2 cup of pumpkin puree
  • 1 egg beaten
  • 1 tablespoon of vegetable oil

Directions:

  1. Sift flour, sugar, baking powder, cinnamon, and nutmeg together in a bowl. Melissa and I couldn’t find a sifter so we combines the ingredients in a bowl whisked them to break up the flour and make it fluffy.
  2. Whisk milk, pumpkin, egg, and oil together in a bowl. Pour milk mixture into flour mixture and stir until just moistened. The directions said the batter should be slightly lumpy, but our batter turned out very smooth.
  3. This is the step where we stopped following the pancake recipe and followed the pancake muffin recipe. We added the pancake mix to the muffins cups. Leave enough room for the mix to rise when it is baking. Bake for 18-20 minutes.

When we initially tasted them we put syrup on them, but in the morning on the run they taste just as good without the syrup.

IMG_9039

These are perfect for a holiday breakfast, or any day. They are easy and definitely delicious. Enjoy!

XOXO

Mel and Darby

Dutch Apple Pie

When we think of fall favorite recipes you normally think pumpkin pie, stuffing, cranberry sauce, turkey, green beans, cider mill donuts, apple cider, and one of my favorites apple pie. If you have ever made apple pie you know that finding the perfect recipe can sometimes be difficult. Well this year do not worry because we have found the perfect recipe for you AND it is Dutch apple pie, so it is even better than classic apple pie with the sugar crust on top baked until golden brown. Even with a graham cracker crust. This isn’t the normal crust for an apple pie, but if you try it this way you wont regret it.

Ingredients

Crust:

  • 1 1/2 cups graham crackers
  • 6 tablespoons melted butter
  • 1/2 teaspoon ground cinnamon
  • 1/3 cup sugar

Apples:

  • 5 1/2 cups peeled cored sliced cooking apples
  • 1 tablespoon lemon juice
  • 1/2 cup granulated sugar
  • 1/4 cup brown sugar, packed
  • 3 tablespoons flour
  • 1/2 teaspoon ground cinnamon
  • 1/4 teaspoon ground nutmeg

Topping:

  • 3/4 cup flour
  • 1/4 cup granulated sugar
  • 1/4 cup brown sugar, packed
  • 1/3 cup butter or margarine, room temperature

Snapchat-7956421912631795963

Snapchat-3645577944699342993

Preheat the oven to 375 degrees.

First is the crust. Take the graham crackers and crush them until you get 1 1/2 cups. Melissa put them in a plastic bag and used Aidan’s toy hammer to crush them, but if you don’t have a toy hammer I find a wooden or plastic cooking spoon does the job as well. When those are all crushed and you have enough put them in a bowl and add the melted butter, ground cinnamon, and granulated sugar. Mix them together and when they are all mixed together put them in the pie pan. Press the crust on the bottom and the sides. Set aside for later.

Next is the apples. Cut, peel, and core 5 1/2 cups of cooking apples. Cut them into small to medium pieces. Put them in a mixing bowl and add the lemon juice, granulated sugar, brown sugar, flour, ground cinnamon, and ground nutmeg. Mix with a mixing spoon and leave them in the bowl until you mix the topping together.

Last but not least is the topping. In a medium mixing bowl crumble the flour, sugar, brown sugar, and butter. Do not melt the butter or mix with a mixer. When the ingredients look like crumbs it is mixed well enough. After you finish the topping you can put the apples into the pie crust and add the topping evenly.

Snapchat-1735957552450906758

Bake for 50 minutes, the top should look golden brown.

Snapchat-4225410936612623290

Let the pie cool and then cut. You can eat just the pie or add ice cream for an extra sweet taste.

Snapchat-7206796619827868849

This is such an easy and delicious recipe that you can do it any time of the day and with the kids if you would like. Guaranteed to be a crowd please at any occasion, especially the holidays.

XOXO,

Mel & Darbs

Jenna Kator Handbags

With the weather getting colder and the new fall colors appearing all over, there comes a time when you need to get a handbag to match. When Posh starting carrying the Jenna Kator handbag line we all instantly fell in love.

Jenna Kator is a local designer from Livonia, Michigan and we are an exclusive retailer in the area. Jenna names and designs all her handbags, wristlets, cross body bags, and wallets after places in Michigan. She also uses a vegan leather. Vegan leather goes through a higher processing than a fake leather, but it does not use animal products. Each bag comes with a dust bag to store it in when you are not using it so that it stays nice and clean.

Cascade_Bark_Brown_grande(Cascade satchel in Bark Brown)

This is one of the new designs Jenna came out with this fall as well as the color. It looks so cute as a cross body and/or with the short straps. It also comes in metallic and midnight black. This handbag comes with the following features:

  • Double handles handle • Drop: 5.5”
  • Pockets: Exterior 1 back zip | Interior: 1 zip, slip (2 front & 2 back)
  • Interior pen slots, key holder on rope detachable & exterior metal feet
  • jenna kator signature print lining & dust bag
  • jenna kator signature flower logo engraved on all zippers
  • Extra-long matching detachable adjustable strap
  • Imported   •11.5″L x 8″H x 7.5″W
  • Double zip-around top closure

Rockford_Midnight_Black_grande(Rockford in Midnight Black)

This is also a new bag and color this season and is Melissa’s favorite. This bag has three different compartments, but it doesn’t look big when you use them all. This bag also comes in beige and royal red. This bag comes with the following features:

  • Pockets: Exterior 1 back zip | Interior 1 zip & 2 double side
  • Interior pen slots, key holder & exterior metal feet
  • jenna kator signature print lining & dust bag
  • jenna kator signature flower logo engraved on all zippers
  • Extra-long matching adjustable strap
  • Imported
  • 11.5″L x 10.5″H x 5″W
  • Top snap w/ zip closure

Ada_Metallic_grande(Ada cross body/wristlet in Metallic)

This is one of Jenna’s new fall designs and color as well. This bag is perfect for a night out with the girls, or at your favorite artists concert. It doubles as a wristlet and a cross body bag. This bag comes in metallic, midnight black, royal red, spruce green, and white sparkle. This bag has the following features:

  • Extra-long matching detachable adjustable strap
  • Magnetic snap closure
  • Pockets: Exterior 1 back zip | Interior 1 zip, 1 slip
  • Two card slots on interior back wall
  • jenna kator signature print lining & dust bag
  • Imported   • 8.5″L x 5″H x 1″W
  • Detachable matching wristlet strap

Saguatuck_Royal_Red_grande(Saugatuck wristlet in Royal Red)

This is one of Jenna’s classic wristlet designs but in her new wonderful fall color royal red. This bag has her classic wristlet design that includes the detachable strap for it to double as a wallet. Inside it has the three pockets for your credit cards and id. This comes in the new fall colors including bark brown, beige, champagne, metallic, and royal red as shown above. This wristlet includes the following features:

Detachable strap
• Zip closure
• Three interior slip pockets
• Exterior back snap pocket
• Jenna kator signature print lining & dust bag
• Jenna kator signature flower logo engraved on zipper
• Imported • 8″L x 5.5″H

With Jenna having so many options with her bags including the designs and colors there isn’t enough time to talk about all of them. We are so excited to announce this fall line. We hope you enjoy it as much as we do. We have had such a great turn out so far that we are placing a re-order for the line. Check out our website for all of the new handbags. With so much variety you are sure to fall in love.

XOXO

Darby

Sorry We Have Been Gone

Posh Dolls,

We are sorry that we have been gone for so long. We have been so busy with getting our store ready for the exciting new fall and winter trends. We have come across some very exciting new things for this season like our new bracelet line called Simbi Haiti. With this line every bracelet has touched and employed 15 people. Each bracelet is hand made with love. The Haitian’s travel to the mountains of Haiti, hand pick the clay, then form the clay into beads and hand paint them. After the bracelet is baked they become the beautiful and stylish bracelet that we carry in our store. With each bracelet that is bought Simbi Haiti donates a gallon of fresh, clean water impacting millions of Haitian lives. To this day Simbi Haiti has donated over 15 million gallons of fresh clean water. “Purchasing Simbi products ultimately *saves lives *improves lives and *empowers lives.”

FullSizeRender

IMG_8669

We are only down to six bracelets left but don’t worry we have just reordered more because these were such a popular trend and they are super cute together or just one of them. My boss Melissa wears her stacked with our blessing bracelets as shown in the picture directly above. So cute!

I will be keeping you updated on all of the fun, exciting, and new trends, styles, and more from Posh.

XOXO

Darby

How to wear a blanket scarf

The plaid blanket scarves are a huge trend this fall!  For many, this is fun yet a confusing trend.  It looks so cute on everyone else but when you pick up this gigantic scarf all you think is, now how the heck do I put this on?  Many of you may also feel this scarf is overwhelming or too large for you to wear.  Posh is here to help!

Today I am going to show a great way to tie the blanket scarf so it is just the right size.

  1. Grab the scarf by each corner and hold it up. redblkblketscf

2. Now drop one side of the scarf and slide both hands so you are holding the scarf in front of you like the photo below.

IMG_9461 IMG_9462

3. Hold the scarf up to your neck and wrap it around once loosely and let each side hang down in front of you.

IMG_9463 IMG_9465

4. Now take the two ends and cross them under each other and through the loop like you are tying a shoelace.

IMG_9466 IMG_9467

5. Pull each end so they are even and flat.  Loosen the scarf around your neck a bit and voila! The perfect trendy way to wear a blanket scarf!

IMG_9470

Doesn’t this make you want a gorgeous blanket scarf?  We have three different colors on our website right now. Click the images below to buy one!

IMG_9470IMG_9502IMG_9517

XOXO,

Mel

Egg Canvas Painting

When my friends and I get together we are always trying to find something new and fun to do and the day I had an idea and all I said was eggs, we need eggs, they looked at me like I was crazy. But this project ended up being super fun for all of us to do. It is a cute homemade gift or something crafty to keep for yourself.

The egg canvas painting sounds weird and messy at first, but it is super fun and not so messy at all.

IMG_7330 (1)

All you need is:

  1. 12-18 eggs shells with the top cracked off
  2. An assortment of acrylic paints (colors of your choice)
  3. A paint canvas
  4. Scissors
  5. Tissue Paper

Step 1: The Eggshells. Be careful when you are cracking the eggs so that it is not more than just the top that is cracked off (its okay if it is more just not half of the eggshell can be gone). Try to keep the carton too when you get all the eggshells cracked because it is a great thing to put them in when they are full of paint.

Step 2: The Paint. Fill the eggshells about halfway with the acrylic paint and place upward in the empty egg carton.

IMG_7336 (1)

Step 3. The Tissue Paper. The tissue paper is if you want to cut a piece and put it on top of the paint filled eggshells. It is good if you want to make it the least messy as possible, especially if little ones are taking part in the craft. My friends and I decided against the tissue paper but below is a picture of what it looks with tissue paper over it.

Step 4. Throwing the Eggshells. We took the canvas outside and put it against a tree. after we threw it the first time we realized it would work a lot better if we put something hard directly behind it, like a wooden slat. We didn’t have one so we opted to throw closer and harder. After everything is set up outside, the next thing to do it throw them. It was actually a lot of fun.

IMG_7337 (1)

IMG_7339 (1)

IMG_7340 (1)

After you are done you get a really cool, unique painting. My friends and I are 18,19, and 20. We had a lot of fun with this and I cant imagine how much fun little ones would have. Fun for all ages, creative, and unique. The perfect craft for any day.

XOXO

Darby ❤

POSH’S OUTFIT OF THE WEEK

IMG_7618 IMG_7619

Our new look for less this week! I love this top with the t-party leggings for a comfy outfit for any day. A lot of people search and search for that perfect top with leggings and this is it. You can also pair it with our YMI jegging if you do not like leggings. The jeggings feel like leggings, but look like jeans.

Top with Leggings: $50 (add a sugarlip for only $10 more!)

Top with Jeggings: $60 (add a surgarlip for only $10 more!)

XOXO,

Darby💖

Get motivated after vacation  – healthy ranch recipe

After traveling it can be so hard to get back on track with healthy eating and work outs.  I felt that pain this morning when I started a new 21 day fix challenge which included sending a photo of myself as a starting point for the challenge. That was brutal but with weekly photo submissions, it will help keep me motivated without the risk of cheating.  As the summer really comes into full swing, I am guessing many of you are having a hard time keeping your health motivation.

                                             
Yesterday morning I made a point to sit down and set my meal plan for the week before hitting the grocery store. Now, I am fully prepared for a busy week.  I seriously feel that meal planning is critical since when I am given full rein to pick what I want to eat when I am starving, it always ends in me pounding down a massive amount of carbs.  I wanted to share a great Greek yogurt ranch recipe that I brought into my meal planning today.

I love salad but I am also NEED to douse my salad in ranch.  That is not exactly 21 day fix approved.  So below is a really good homemade ranch recipe I stumbled across that goes a long way.  You may think that taking a cup of Greek yogurt and adding a packet of ranch seasoning is the easiest route but I have read the ranch packets are loaded with MSG so I decided adding my own seasonings is the better choice.


What you need:

  1. 1 cup of Greek yogurt
  2. 1/2 tsp garlic powder
  3. 1/2 tsp onion powder
  4. 1/4 tsp chives
  5. 1/4 tsp parsley
  6. 1/4 tsp dill
  7. 1/8 tsp sea salt
  8. 1/8 tsp ground black pepper
  9. Squeeze of a fresh lemon
  10. 2 tbsp of water add more to get desired consistency

Mix all ingredients together and refrigerate for about a half hour before eating. It is great on salads or as a veggie dip.


After a few days off from workouts, I did find it easier to make excuses why I didn’t need to start back up today.  So without allowing myself to think too much I ran up to my room threw on my workout clothes and started.  During warm ups I can hear the little voice in my head telling me I won’t make it through.  By the time the actual workout starts I am over those thoughts.  All you have to do is remember why you started and how you feel every time you have to start over.

At Posh, we started carrying a fun new active wear line.  I am so excited at the popularity of this line.  I had to grab myself a sports bra for my own workouts.  Let me tell you the material is amazing!  They are so cute and so breathable.  We offer them in 4 colors and they are available on our website for only $15!!

http://www.poshnovi.com/collections/new-arrivals


                                                Click here to order now!   

           Order our coral sports bra now!

XOXO,

Mel 💕

POSH’S OUTFIT OF THE WEEK

Check out Posh’s look for less! You can get both outfits at less than $100 each! Restrictions do apply.

Image

Our favorite trendy pant with our favorite basic tank and sandal on sale for only $75! Hurry there is a limited amount available.

FullSizeRender

This outfit is on sale for $80. It includes our favorite trendy cropped hoodie with high wasted shorts. Don’t forget our cute fringe sandal and purple Sugarlips tank top! Hurry in to get it before its gone!

XOXO, Darby

4th of July Fun, Sweets & Style

The 4th of July is one of my favorite summer holidays!  Our family gets together every 4th of July up at my parents house and spends an entire weekend eating, drinking, boating, and swimming in the lake.  Darby, Tori & I wanted to share a fun post of ideas to celebrate the holiday.  Read through to find out details on our 4th of July in-store sale!

Tori wanted to share a fun red,white, & blue cupcake recipe. I personally tried one of the cupcakes and I swear they were so tasty!

IMG_8689

I decided to try this fun baking idea for the 4th of July. Its a great idea if you’re hosting or attending a party. Everyone will love these festive cupcakes.

Ingredients:

  • Red velvet cake mix
  • Cream Cheese Icing
  • Red and white Candy Pearls
  • Blue and red sprinkles
  • Cup cake liners

IMG_8691

Follow the directions on the cake mix to make the cupcakes. After they are cooked let them cool for about 15 minutes. Than spread the frosting and design them using the pearls and sprinkles. Super easy and they taste great.

~Tori

IMG_7312

I chose to make a fun and easy t-shirt with a design that looks like fireworks for the 4th of July! It is super easy and fun for the kids to make as well.

What you need:

  • a white or light colored t-shirt
  • rubbing alcohol
  • sharpies
  • and a spray bottle (from the $1 store works just fine)

IMG_7313

Step 1: Lay the t-shirt flat on a table and put dots in any shape you would like in any place on the t-shirt. You can do it on the whole shirt or in just some spots. I only put them in certain spots on the t-shirt.

IMG_7315

Step 2: After you finish putting the Sharpie on the t-shirt take it outside and lay it on the ground. If you don’t want the sharpie bleeding through to the other side of the shirt I would put a couple pieces of cardboard in between the front and back of the shirt. Put the rubbing alcohol in the spray bottle and spray it as a mist onto the shirt. The more you spray the more it will run. Spray a little and watch it to see it run and spray more if desired.

IMG_7322

After that let it dry and there you have got it! A fun and easy 4th of July craft that an age can do.

XOXO Darbs

Let’s finish up our 4th of July post with fun stylish outfits for the weekend!  Each one of us chose our favorite from our new arrival collection. Click the outfit to find it on our website!  Stop into Posh now thru Sunday, July 5th for our summer stock up sale! Get up to 30% OFF your entire purchase. Restrictions apply.

1 item receive 10% OFF.
2 items receive 15% OFF.
3 items receive 20% OFF.
4 items receive 25% OFF.
5 or more items receive 30% OFF.

Valid in-store only. Valid thru 7/5/15 only. Must mention our blog at checkout. Not valid on previous purchases or combined with any other offer, sale, or loyalty card. Excludes sugarlips and lokai.

IMG_8476 4thofjulydress1IMG_8481

We chose maxi dresses because they are so easy to throw on! The maxis are lightweight and perfect for a hot summer day.  If it’s a cooler day (which can totally happen in Michigan) throw on a denim jacket and a scarf to warm up. Lastly, we chose our new navy and red tank.  We threw it with white capri leggings but can easily pair with shorts or jeans!
4thofjulytop

XOXO,
Mel


Healthy Sweets, Motivation & Style

Chocolate Chip Cookie Dough Yogurt

I wanted to share this fun recipe I found! I have a super sweet tooth and this will hit the spot and keep you on a healthy track!

IMG_8275

What you need:

3/4 Cup of plain greek yogurt
1 TBSP of all natural peanut butter
1 TBSP honey
1/4 tsp of vanilla extract
dash of sea salt
1 tsp of chocolate chips

IMG_8278IMG_8280

Add peanut butter, honey, vanilla extract and sea salt to your yogurt and mix. Top with chocolate chips and your done!

Even my 2 year old loves it.

Turn it into frozen yogurt by placing in the freezer for 15-30 minutes.

“Sore Today, Strong Tomorrow”

IMG_7980d

I love this quote! It’s great to remember when you are starting that new workout and half way through you feel like you just won’t make it to the end. Push yourself to finish and with each day you get stronger and better. You can also remember it that next morning when you go to step out of bed and your muscles are screaming at you! Hahah.

I feel like this quote is for so much more than just working out. It has to do with everything in life you need to change or let go of for yourself, your health, and your mental well being. It may be hard at that moment but in the long run, it makes you a stronger person.

My best friend has started living by this quote.  She has two gorgeous twin boys and life has definitely thrown her for an emotional rollercoaster the last few years. But she has come out stronger because of it. She is my inspiration and motivator for getting through some of life’s hardest moments. With all that, she has also lost about 50 pounds in the last year! She is healthier than ever.
Throw it on for that first work out or it is definitely super cute with a pair of jeans!

As my Monday motivator, mention my blog and get 10% OFF the Sore Today, Strong Tomorrow Tank.  Use checkout code sore if you are purchasing it from my website. Click here to order!

XOXO,
Mel

Flower Mason Jar Craft

Do you ever sit around on a lazy Sunday morning and think of things that you could do for the day? Crafts are always a fun and easy thing to do. This craft is cheap, easy, and only takes about 10 minutes. You can get your supplies from any craft store. I got mine from Hobby Lobby.

Step 1: Gather your supplies. You need a mason jar (any size), rocks, twine, scissors, and a flower (real or fake).

craftflower2

Step 2: Take the flower and the scissors and cut the stem to a length that will fit inside
your jar.  Use your jar to size how much you want to cut off.  Cut the flower stem on an
angle.

craftflower3

Step 3: This is a simple step. Just put the rocks inside the jar. Be careful not to just drop them so that the glass will not crack. I used about 7 rocks but it can vary on how big your jar is or how many you think looks good.

craftflower4

Step 4: The next step is to wrap the twine. Take a piece measure it by your wingspan and cut it. Than wrap it around the jar twice or three times depending on the size. Than tie it in a bow.

craftflower5

Step 5: This is the last step. Just add water about 3/4 of the way and put the flower in the jar. And there you go, a cute fun craft that will brighten up your house and hopefully your day.

craftflower6

XOXO,
Tori

Trend Alert – Palazzo Pants

Summer is finally here! I think. We’ve had our ups and downs this season. But as the warm weather hits so do so many gorgeous prints, lightweight fabrics, and fun pieces to create the perfect stylish wardrobe.

Today, I wanna highlight one of my absolute favorite trends, the palazzo pant. The palazzo pant is a super wide leg, loose fitting pant that was extremely popular back in the late 60’s thru the early 70’s and has made a major comeback in fashion.

I know many of you will start off by saying, “I’m too short” or “They will make my legs look bigger.” Well throw those excuses right out the window! 😉 The reason why I absolutely adore this trend is not only because the options are so much fun but because the light flowy fabric hides insecurities and accentuates your waist for a super flattering look. The options are so versatile. The palazzo pants offer style and comfort! This style is easy to dress down for a day of shopping or drinks with friends or dress up for a night out with that special someone.

See below for style inspiration and pop into Posh to see this look for yourself!

casualpalazzo

1. Sold in-store only. Limited quantities. 2. Modal Racerback Tank 3. Tye Dye Palazzo Pant 4. Bandeau

palazzodressup2

1. Lace eyelet top 2. Tye Dye Palazzo Pant 3. Bubble Bracelet is sold in-store only. Quantities are limited.

casualpalazzo2

1. V-neck Tee 2. Tye Dye Palazzo Pant 3. Tuscan Fringe Sandal 4. Beaded necklace is sold in-store only. Quantities are limited.

dressuppalazzo1

1. Necklace set is sold in-store only. Quantities are limited. 2. Top is sold in-store. Call Posh to order (248-960-8205) 3. Tye Dye Palazzo Pant 4. Tuscan Fringe Sandal

Anything that is not sold online, you can call our store at 248-960-8205 and order. Pop into Posh today and mention this blog at checkout for 10% OFF palazzo pants or any of the pieces in the above collections. Use code Palazzo at checkout on http://www.poshnovi.com and don’t forget if you live local you can choose the free in-store pick up option.

Stop in and try this trend, I promise you won’t be disappointed! Happy Shopping!

XOXO,
Mel